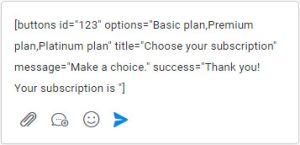
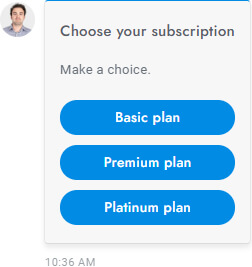
When creating custom rich messages, you can use HTML codes to include images, links, and other interactive elements. For example:
| Code |
Description |
<a href="https://www.google.com" target="_blank" class="sb-rich-btn sb-btn">Click here</a> |
Link with button design. |
<a href="https://www.google.com" target="_blank" class="sb-rich-btn sb-btn-text">Click here</a> |
Link. |
<div class="sb-image"><img src="https://via.placeholder.com/1500x600" class="sb-image" /></div> |
Image that zoom on click. |
The allowed file attachment extensions for rich messages are .jpg, .jpeg, and .png. The system automatically displays these formats to users.
When a user completes a rich message, the response data is saved in JSON format in the database under the table sb_messages and column payload. The response structure includes information about the type of rich message and the user’s input. For example:
{"rich-messages":{"4Voyu":{"type":"email","result":{"email":["[email protected]","Your email ..."]}}}}
All rich messages support the following global parameters:
| Parameters |
Description |
id="123" |
The ID of the rich message (used also to save the JSON data). |
title="ABC" |
The rich message title. |
message="ABC" |
The rich message description that appears underneath the title. |
success="ABC" |
The message that appears when the user completes and sends the rich message. The user input is appended to this message. |
settings="ABC" |
Extra field for optional extra values. |
You can create custom rich messages with your own content by going to Settings > Miscellaneous. Custom rich messages are static and currently don’t offer interactive options like shortcodes. However, you can insert custom HTML codes to create rich content.
Here are some examples of available Rich Messages and their corresponding shortcodes:
| Name |
Shortcode |
Description |
| Card |
[card image="URL" header="TITLE" description="Lorem ipsum dolor sit amete" link="URL" link-text="Purchase" extra="$599" target="_blank"] |
Call-to-action card with an image, title, description, link, and more. |
| Slider |
[slider image-1="URL" header-1="TITLE" description-1="Lorem ipsum dolor sit amete" link-1="URL" link-text-1="Purchase" extra-1="$599" image-2="URL" header-2="TITLE" description-2="Lorem ipsum dolor sit amete" link-2="URL" link-text-2="Purchase" extra-2="$599" target="_blank"] |
Slider of call-to-action cards with an image, title, description, link, and more. You can add up to 10 slides. |
| Slider images |
[slider-images images="URL,URL,URL"] |
Slider of images. |
| Chips |
[chips options="A,B,C"] |
List of buttons. |
| Buttons |
[buttons options="A,B,C"] |
List of buttons. |
| Select |
[select options="A,B,C"] |
Dropdown list of options. |
| Inputs |
[inputs values="A,B,C" button="Send now"] |
List of text inputs. |
| Email |
[email name="true" last-name="true" phone="true" phone-required="false" placeholder=""] |
Form to collect the user’s email and phone number. All attributes are optional. Follow up settings used as default values. Add the attribute required-messaging-apps="true" to force users to provide their email and phone on messaging apps. |
| Registration |
[registration] |
Registration form. |
| Timetable |
[timetable] |
Timetable. |
| Articles |
[articles link="https://chat.rpaix.com/articles-demo"] |
Articles with search area. The link attribute is used as fallback message for Facebook Messenger, WhatsApp, Telegram messages. |
| Rating |
[rating label-positive="Helpful" label-negative="Not helpful" label="Rate and review" success-negative=""] |
Agent rating form. To make the rating shortcode work on WhatsApp, Messenger, Telegram you need to use Dialogflow and the chatbot, create a new Intent with rating as input Context, nothing as output Context, a list of the user’s most common messages for a positive rating as Training phrases(e.g. good, positive) and { "rating": 1, "force-message": true } as Custom Payload response. For the negative rating create a new intent with same context but replace the training phrases and the custom payload to { "rating": -1, "force-message": true } . The shortcode must include also a title or message. |
| List |
[list values="A,B,C"] |
Text list. |
| List double |
[list values="A:X,B:Y,C:Z"] |
Text list with titles. |
| List image |
[list-image values="URL:A,URL:B,URL:C"] |
Text list with titles and images. |
| Table |
[table header="A,B,C" values="A:B:C,A:B:C,A:B:C"] |
Table. |
| Button |
[button link="https://chat.rpaix.com" name="Click here" target="_blank" style="link"] |
Display a link or open an article. The attribute target="_blank" is optional and open the link in a new window. The attribute style="link" is optional and change the button design. To open an article on click the link value must be #article-ID, replace ID with the article ID. |
| Video |
|
Display a YouTube or Vimeo video. The value of the attribute type can be youtube or vimeo. The attribute id is the ID of the video, get it from the URL. The attribute height is optional and sets the video height in px. |
| Image |
[image url="https://chat.rpaix.com/media/admin.png"] |
Image. |
| Share |
[share fb="https://chat.rpaix.com" tw="https://chat.rpaix.com/" li="https://chat.rpaix.com/" pi="https://chat.rpaix.com/" wa="https://chat.rpaix.com/"] |
Social share buttons. |
1. Create: Generate a rich message by inserting the corresponding shortcode into the text editor of the admin area. Customize the shortcode’s parameters with your desired information.

2. Display: Once the message is sent, the user sees the rich message (not the shortcode). Users can interact with buttons, inputs, or other elements.

3. Submit: When a user fills out and sends the rich message form, a success message is displayed, and the form data is saved.

Rich messages are specialized messages that include interactive features like buttons, dropdowns, or inputs. These messages allow agents to request information from users via input forms or to display interactive content. Rich messages can be inserted into chat messages using shortcodes. Shortcodes accept various parameters, such as title and description, to customize the message content.
For security reasons, HTML, JavaScript (JS), or other code languages are not permitted in messages within the text editor or automated messages. However, you can utilize HTML snippets by using custom rich messages, which allows you to add structured content with HTML.
Merge fields are strings that get replaced by external values when used in messages. These fields can be used in any message or automated message, including those sent by the chatbot. Here are some commonly used merge fields and their descriptions:
{user_name}: Replaced by the full name of the active user.{user_email}: Replaced by the email of the active user.{agent_name}: Replaced by the full name of the active agent.{agent_email}: Replaced by the email of the active agent.
The text editor in the chat.RPAiX’s admin area and automated messages (e.g., welcome and subscribe messages) offer the ability to create stylized messages. Here’s how:
- Links Formatting: All text links are automatically converted into clickable hyperlinks.
- Text Formatting Syntax:
- To make text bold, surround it with
* : your text.
- To make text italic, surround it with
__ : your text.
- To make text strikethrough, surround it with
~ : your text.
- To insert a single-line code comment, surround it with
:your text`.
- To insert a code block, surround it with
``` : “your text“.
- HTML and Code Languages: While HTML, JavaScript (JS), and other code languages are not permitted for security reasons, you can use HTML snippets with custom rich messages.
- Inserting Line Breaks: Use SHIFT + ENTER or CTRL + ENTER to insert a line break into a message.
No, once a message is deleted by an agent, it cannot be recovered. It’s important for agents to exercise caution when deleting messages to avoid permanent loss of data.
Yes, agents have the ability to delete their messages within a conversation. To do this, they need to open the message menu by hovering the mouse cursor over the message and then clicking the “Delete” option. This gives agents control over the messages they’ve sent.
When a user is deleted, all conversations and messages associated with that user are permanently deleted as well. This ensures the data remains consistent and avoids orphaned conversations.
Trashed conversations are automatically deleted after being in the trash for 30 days. This helps maintain the system’s efficiency by removing unnecessary data.
When a user sends a new message to a conversation that’s been archived or trashed, the conversation is automatically restored and becomes visible in the Inbox area once again.
You can search for conversations using various criteria, including department ID, assigned agent ID, conversation title, conversation ID, message text, message attachment name, user first name, user last name, and user email. This makes it easier to locate specific conversations in your system.
Conversations (Chats) have four different statuses: mark as read, archive, delete, and restore. You can manage these statuses as follows:
- Open the conversation in the conversations area.
- Click the corresponding icon buttons in the top-right corner of the conversation window to perform actions like marking as read, archiving, deleting, or restoring conversations.


